| 일 | 월 | 화 | 수 | 목 | 금 | 토 |
|---|---|---|---|---|---|---|
| 1 | 2 | 3 | 4 | 5 | 6 | 7 |
| 8 | 9 | 10 | 11 | 12 | 13 | 14 |
| 15 | 16 | 17 | 18 | 19 | 20 | 21 |
| 22 | 23 | 24 | 25 | 26 | 27 | 28 |
- 인프런강의
- uikit
- 파이썬
- 파이썬중급
- 노드JS
- 자바스크립트
- swift
- 토플
- 웹크롤링
- SwiftUI
- IOS프로그래밍
- Python3
- 프로그래머스
- 스위프트
- 우리를위한프로그래밍
- JS
- 토플공부수기
- 인프런파이썬
- 인프런오리지널
- 인프런
- IOS
- rxswift
- 카카오톡채팅봇
- 파이썬중급강의
- 교환학생토플
- nodeJS
- 유학토플
- 인프런파이썬강의
- 파이썬웹크롤링
- 리프2기
- Today
- Total
먹고 기도하고 코딩하라
[UIKit] 뷰의 동적 넓이 변경에 GradientLayer 대응하기 본문
기본적으로 뷰에 GradientLayer를 깔려면 다음과 같이 해야 한다.
- CAGradientLayer를 생성하고, frame은 그라데이션을 깔 뷰와 동일하게 맞춰준다. (origin, width, height를 동일하게)
- 그라데이션할 컬러를 2가지 이상 .colors에 [CGColor] 형태로 담는다.
- startPoint와 endPoint를 지정하되, x, y의 최소값은 0.0, 최대값이 1.0임을 알고 그 안에서 조절한다. 여기서는 가로 방향 그라데이션을 만들어볼 것이다.
레이어에 대한 설정이 끝났으므로, 뷰의 layer.insertSublayer로 레이어를 삽입한다.
코드는 다음과 같다. 스토리보드로 gradientView를 만들었고, constraint는 다음과 같다.
- center
- width : 100
- aspect ratio 1:1
class ViewController: UIViewController {
    @IBOutlet weak var gradientView: UIView!

    override func viewDidLoad() {
        super.viewDidLoad()
        // Do any additional setup after loading the view.

        let gradient = CAGradientLayer()
        gradient.frame = gradientView.bounds
        gradient.colors = [UIColor.blue.cgColor, UIColor.purple.cgColor]
        gradient.startPoint = CGPoint(x: 0.0, y: 0.5)
        gradient.endPoint = CGPoint(x: 1.0, y: 0.5)
        gradientView.layer.insertSublayer(gradient, at: 0)
    }
}
이제 “변환”이라는 버튼을 눌렀을 때 크기가 커졌다 작아졌다 하는 애니메이션을 추가할 것이다.
UIButton을 추가하고, Touch up Inside 이벤트로 IBAction 메소드를 하나 걸어준다. 버튼을 눌렀을 때 뷰 크기가 두 배가 되도록 한다.
먼저 IBOutlet으로 gradientView의 width constraint를 변수로 딴다. 그런 다음, IBOutlet 메소드에서 이 width constraint 값을 200으로 늘려준다.
기대하는대로 레이어까지 늘어날지 쉽게 확인하기 위해, gradientView의 배경 색은 노랑색으로 바꿔두고 진행하겠다.
@IBAction func onButton(_ sender: UIButton) {
        sender.isSelected = !sender.isSelected
        guard sender.isSelected else {
            self.gradientView.layer.removeAllAnimations()
            return
        }

        UIView.animate(withDuration: 1, delay: 0, options: [.repeat, .autoreverse], animations: { [weak self] in
            guard let self else { return }
            self.gradientViewWidthConstraint.constant = 200
        })
    }
2가지 문제점이 보인다.
- 뷰는 커졌다 작아졌다 하는 애니메이션도 하지 않는다.
- UIView의 크기만 변하고, 레이어는 원래 크기를 유지하고 있다.
왜 이런 일이 생기는 걸까?
- 애니메이션은 레이아웃을 업데이트가 필요한 작업인데, 뷰/레이아웃 업데이트 메소드를 호출하지 않았다. 따라서, 적절한 업데이트 메소드를 호출해야 한다.
- 레이어의 frame을 조정하지 않았다. 뷰와 레이어의 frame, bound는 별개이다. 분명 뷰의 레이어로 존재하기는 하지만 frame까지 완벽하게 따라가진 않기 때문에, 레이어의 frame을 업데이트해줘야 한다.
1번부터 고쳐보겠다. 레이아웃 업데이트 메소드에는 여러 가지가 있는데, 이런 경우에는 layoutIfNeeded()가 적당하다. (왜 그런지는 다른 포스팅에서 소개할 예정)
animate 메소드에서 layoutIfNeeded()를 추가로 호출하자.
UIView.animate(withDuration: 1, delay: 0, options: [.repeat, .autoreverse], animations: { [weak self] in
            guard let self else { return }
            self.gradientViewWidthConstraint.constant = 200
            view.layoutIfNeeded()
        })
뷰가 작아졌다 커졌다를 반복하는 애니메이션을 수행한다. 1번을 해결했다.
이제 2번을 해결해야 하는데, 방법은 간단하다. CAGradientLayer의 frame을 늘려놓은 뷰의 bounds와 동일하게 설정해주면 된다.
UIView.animate(withDuration: 1, delay: 0, options: [.repeat, .autoreverse], animations: { [weak self] in
            guard let self else { return }
            self.gradientViewWidthConstraint.constant = 200
            view.layoutIfNeeded()
            self.gradient.frame = self.gradientView.bounds
        })
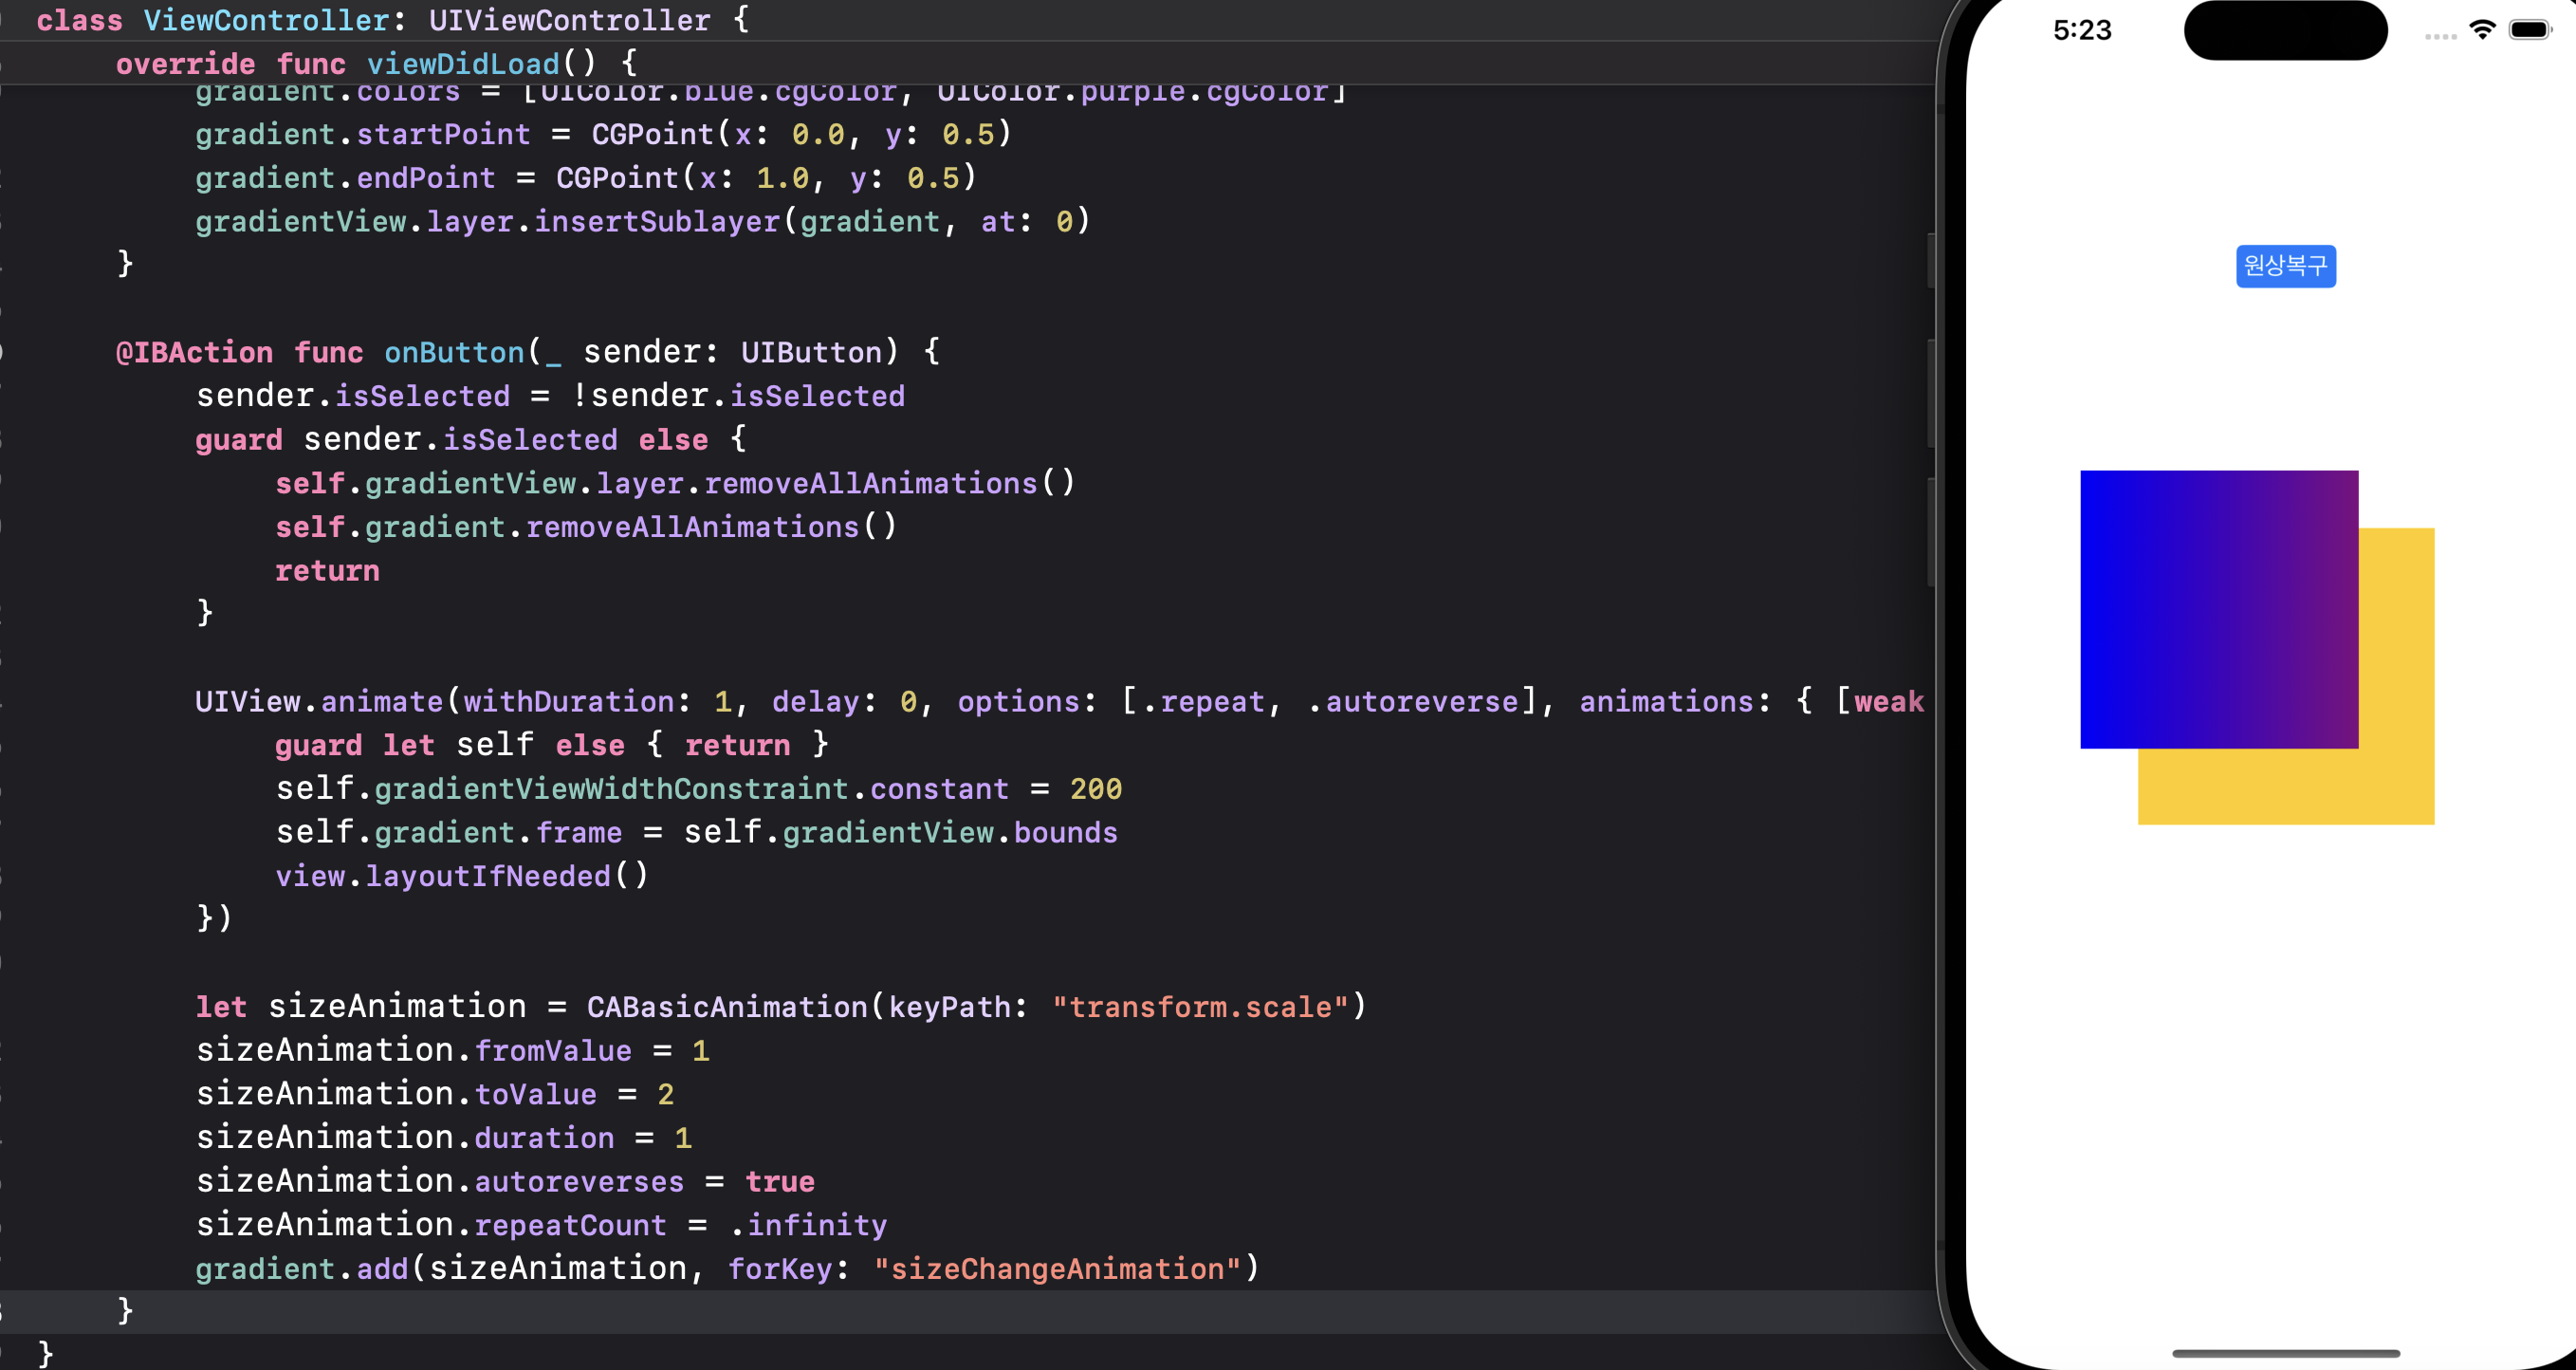
그라데이션 레이어도 뷰의 크기와 같게 늘어난 모습이다.
다만 문제점은, 이 경우에는 원점을 유지하고 늘어났다 줄어드는 게 아니라 위아래로 평행 이동을 반복할 뿐이라는 점이다. (등 긁는 것도 아니고 이게 뭐지?)
UIView.animate는 말그대로 view에만 적용되는 애니메이션이라서 Layer에는 적용되지 않는다. 레이어 애니메이션을 위해 CABasicAnimation이라는 게 있는 데, 이걸 사용해야 한다. (그것도 keyPath를 정확히 적어야 사용할 수 있다)
레이어 애니메이션도 추가해보자.
let sizeAnimation = CABasicAnimation(keyPath: "transform.scale")
        sizeAnimation.fromValue = 1
        sizeAnimation.toValue = 2
        sizeAnimation.duration = 1
        sizeAnimation.autoreverses = true
        sizeAnimation.repeatCount = .infinity
        gradient.add(sizeAnimation, forKey: "sizeChangeAnimation")
뷰와 레이어가 따로 놀면서 애니메이션을 수행한다.
뷰는 center에 constraint을 갖고 있어서 중앙을 중심으로 사방으로 퍼지지만, 레이어는 다른 방식으로 스케일링을 해서 이런 차이가 생기는 듯하다.
아무튼 레이어도 애니메이션은 가능하다. 그러나 빡센 애니메이션이 필요한 디자인에는 CAGradientLayer로 붙이는 그라데이션은 지양하는 게 좋지 않을까 하는 생각이 든다.
코드 전문은 다음과 같다.
import UIKit

class ViewController: UIViewController {
    @IBOutlet weak var gradientView: UIView!
    @IBOutlet weak var gradientViewWidthConstraint: NSLayoutConstraint!
    let gradient = CAGradientLayer()

    override func viewDidLoad() {
        super.viewDidLoad()
        // Do any additional setup after loading the view.
        setGradientLayer(gradientView)
    }

    @IBAction func onButton(_ sender: UIButton) {
        sender.isSelected = !sender.isSelected
        guard sender.isSelected else {
            removeAnimation()
            return
        }
        addAnimation()
    }

    func setGradientLayer(_ view: UIView) {
        gradient.frame = view.bounds
        gradient.colors = [UIColor.blue.cgColor, UIColor.purple.cgColor]
        gradient.startPoint = CGPoint(x: 0.0, y: 0.5)
        gradient.endPoint = CGPoint(x: 1.0, y: 0.5)
        view.layer.insertSublayer(gradient, at: 0)
    }

    func addAnimation() {
        animateViewScaling()
        animateLayerScaling()
    }

    func animateViewScaling() {
        UIView.animate(withDuration: 1, delay: 0, options: [.repeat, .autoreverse], animations: { [weak self] in
            guard let self else { return }
            self.gradientViewWidthConstraint.constant = 200
            self.gradient.frame = self.gradientView.bounds
            view.layoutIfNeeded()
        })
    }

    func animateLayerScaling() {
        let sizeAnimation = CABasicAnimation(keyPath: "transform.scale")
        sizeAnimation.fromValue = 1
        sizeAnimation.toValue = 2
        sizeAnimation.duration = 1
        sizeAnimation.autoreverses = true
        sizeAnimation.repeatCount = .infinity
        gradient.add(sizeAnimation, forKey: "sizeChangeAnimation")
    }

    func removeAnimation() {
        self.gradientView.layer.removeAllAnimations()
        self.gradient.removeAllAnimations()
    }
}
References
'앱 > Swift' 카테고리의 다른 글
| [UIKit] Status bar 폰트 색상 동적으로 변경하기 (0) | 2023.08.17 |
|---|---|
| [UIKit] 탭한 위치가 어느 뷰의 영역 안에 있는지 확인하기 (0) | 2023.08.10 |
| [UIKit] Data(contentsOf:) 대신 URLSession으로 이미지 불러오기 (0) | 2023.07.23 |
| [Swift] 백준의 모든 입출력 처리하기 (0) | 2023.07.15 |
| [UIKit] SceneDelegate와 앱의 라이프 사이클 (0) | 2023.07.06 |


