| 일 | 월 | 화 | 수 | 목 | 금 | 토 |
|---|---|---|---|---|---|---|
| 1 | 2 | 3 | ||||
| 4 | 5 | 6 | 7 | 8 | 9 | 10 |
| 11 | 12 | 13 | 14 | 15 | 16 | 17 |
| 18 | 19 | 20 | 21 | 22 | 23 | 24 |
| 25 | 26 | 27 | 28 | 29 | 30 | 31 |
- 인프런
- swift
- 토플공부수기
- 리프2기
- IOS
- nodeJS
- 인프런파이썬강의
- 카카오톡채팅봇
- 프로그래머스
- 인프런강의
- JS
- Python3
- 파이썬중급강의
- 인프런파이썬
- 토플
- 인프런오리지널
- rxswift
- 우리를위한프로그래밍
- 스위프트
- 교환학생토플
- 파이썬
- 웹크롤링
- 파이썬중급
- SwiftUI
- 자바스크립트
- uikit
- 파이썬웹크롤링
- 노드JS
- IOS프로그래밍
- 유학토플
- Today
- Total
먹고 기도하고 코딩하라
[UIKit] UIScrollView를 이용해 기본적인 스크롤뷰 만들기 본문
스크롤뷰의 Content Layout Guide, Frame Layout Guide 등에 대해서는 설명하지 않고 어떻게 만드는지만 살펴봅니다.
코드, 스토리보드 2가지 방식과 세로/가로 방향 스크롤뷰를 만드는 방법을 모두 다룹니다.
이 글을 참고했으며 좀 더 자세하게 작성했습니다.
0. 스크롤뷰의 이해
스크롤뷰는 실제로 스크롤돼서 보일 뷰들을 담는 Content Layout과 스크린에 보이는 만큼의 Frame Layout을 가집니다. (Content Layout 영역 >= Frame Layout 영역) 이걸 확실히 이해를 해야 Frame Layout에 priority 왜 낮추는지도 이해가 됩니다.
1. 코드
일단 스토리보드를 삭제하고 구현한다고 가정하고 ViewController 소스 코드만 적습니다.
스토리보드를 삭제하고 UIKit으로 구현하는 방법은 이 글을 참고하세요.
이 글을 안 보셔도 상관없지만 다른 글을 보실 때는 잘 살펴야 합니다. 구글에 "스토리보드 없이 개발하는 방법" 등을 검색하면 여러 글이 나오지만, SceneDelegate.swift 파일을 수정하는 글을 보셔야 합니다.
참고로 글을 쓰는 오늘 2022년 8월 2일 기준으로, XCode 버전은 13.4.1입니다.
위의 글과 다르게 현재는 Info.plist가 매우 간소화되었습니다. Information Property List > Application Scene Manifest > Scene Configuration > Application Session Role > Item 0의 Storyboard 설정을 그냥 - 버튼으로 지워주면 됩니다.
그리고 프로젝트 Targets > General > Deployment Info에서도 Main Interface를 공란으로 비워야 합니다.
(1) 세로 방향 스택 뷰
구현할 스택 뷰는 다음과 같습니다. 세로 방향 vertical 스택 뷰에 높이 300, 가로로는 꽉 찬 UI View들을 담아서 화면 전체에 걸쳐 스크롤되게 만듭니다. 이 때, Safe Area 너머의 top, bottom을 넘어가지는 않습니다.
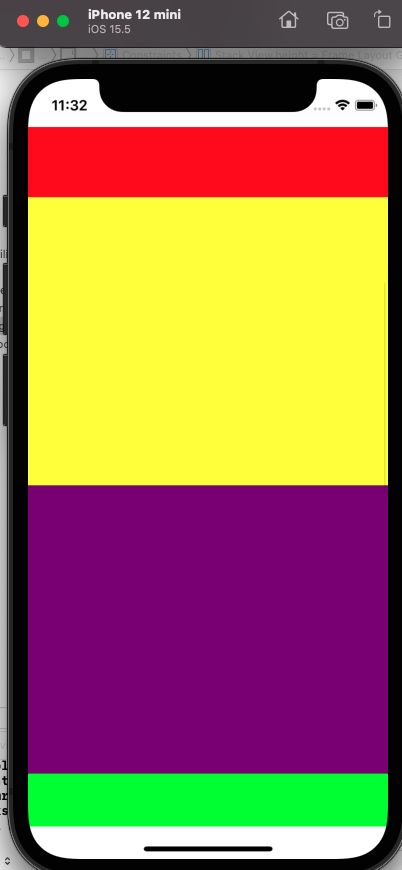
그럼 코드입니다.
먼저 스크롤뷰를 뷰에 서브 뷰로 추가하고, translatesAutoresizingMaskIntoConstraints 속성을 false로 만듭니다. 이건 코드로 Constraints 구현할 때 필수입니다. 이 값은 뷰의 오토리사이징 마스크를 Auto Layout 제약으로 변환할지 결정하는 값입니다.
그 다음 스크롤뷰의 leading, trailing, top, bottom 방향에 대해 모두 view의 anchor에 제약을 걸어 줍니다. 이 때, top과 bottom은 layoutMarginsGuide의 top/bottom Anchor로 잡아주는데, layoutMarginsGuide란 뷰의 마진에 대해 제약을 걸어줄 때 사용하게 됩니다. 여기서는 safeAreaLayoutGuide로 잡아줘도 결과는 똑같은데 나중에 이 둘의 차이에 대해서도 포스팅하겠습니다. 만약, view.topAnchor 혹은 view.bottomAnchor로 잡아주면 Safe area까지 스크롤이 되므로 직접 실험해 보시기 바랍니다.
그 다음 스크롤뷰에 스택 뷰를 서브 뷰로 추가해 줍니다. 스택 뷰를 코드로 구현할 때 주의할 점이 있다면 반드시 axis를 지정해 줘야 한다는 것입니다. spacing은 없으면 0으로 딱 붙어서 나오지만 축은 꼭 정해줘야 합니다. axis 문장을 빼고 빌드하면 뷰가 계획대로 나오지 않습니다.
스택 뷰도 leading, trailing, top, bottom 방향에 대해 스크롤 뷰의 contentLayoutGuide의 anchor에 제약을 걸어줍니다. 여기에 widthAnchor도 걸어줍니다. widthAnchor는 frameLayoutGuide의 widthAnchor와 같게 하면 됩니다. 이렇게 하면 화면 전체를 꽉 채우는 세로 방향 스택이 담긴 스크롤 뷰가 완성됩니다.
fillStackView() 함수는 단순히 UIView를 동적으로 만들어 채워넣는 함수입니다.
import UIKit

class ViewController: UIViewController {
    let scrollView: UIScrollView! = UIScrollView()
    let stackView: UIStackView! = UIStackView()

    override func viewDidLoad() {
        super.viewDidLoad()

        // Do any additional setup after loading the view.

        view.addSubview(scrollView)
        view.backgroundColor = .white

        // addSubview를 먼저 해준 다음 constraint를 더해야 함
        // 그렇지 않으면..
        // because they have no common ancestor.  Does the constraint or its anchors reference items in different view hierarchies?  That's illegal.'
        scrollView.translatesAutoresizingMaskIntoConstraints = false
        scrollView.backgroundColor = .white

        NSLayoutConstraint.activate([
            scrollView.leadingAnchor.constraint(equalTo: view.leadingAnchor),
            scrollView.trailingAnchor.constraint(equalTo: view.trailingAnchor),
            // safeLayoutGuide로 잡으면 safelayout 바깥 쪽은 스크롤 X
            scrollView.topAnchor.constraint(equalTo: view.layoutMarginsGuide.topAnchor),
            scrollView.bottomAnchor.constraint(equalTo: view.layoutMarginsGuide.bottomAnchor)
        ])

        scrollView.addSubview(stackView)

        stackView.spacing = 0
        stackView.translatesAutoresizingMaskIntoConstraints = false

        NSLayoutConstraint.activate([
            stackView.leadingAnchor.constraint(equalTo: scrollView.contentLayoutGuide.leadingAnchor),
            stackView.trailingAnchor.constraint(equalTo: scrollView.contentLayoutGuide.trailingAnchor),
            stackView.topAnchor.constraint(equalTo: scrollView.contentLayoutGuide.topAnchor),
            stackView.bottomAnchor.constraint(equalTo: scrollView.contentLayoutGuide.bottomAnchor),
        ])

        setVerticalStackView()
    }

    private func setVerticalStackView() {
        stackView.axis = .vertical
        stackView.widthAnchor.constraint(equalTo: scrollView.frameLayoutGuide.widthAnchor).isActive = true
        fillStackView("vertical")
    }

    private func fillStackView(_ axis: String) {
        let colorArray = [UIColor.blue, .red, .yellow, .purple, .green, .black, .orange, .gray]
        for color in colorArray {
            let elementView = UIView()
            elementView.backgroundColor = color
            elementView.translatesAutoresizingMaskIntoConstraints = false
            if axis == "horizontal" {
                elementView.widthAnchor.constraint(equalToConstant: 200).isActive = true
            } else {
                elementView.heightAnchor.constraint(equalToConstant: 300).isActive = true
            }
            stackView.addArrangedSubview(elementView)
        }
    }
}
(2) 가로 방향 스택 뷰
가로 방향 스택 뷰의 경우, axis를 horizontal로 바꿔주고, 스택 뷰를 채우는 fillStackView에서 생성되는 UIView들에 width가 아니라 heightAnchor를 걸면 됩니다.
    private func setHorizontalStackView() {
        stackView.axis = .horizontal
        stackView.heightAnchor.constraint(equalTo: scrollView.frameLayoutGuide.heightAnchor).isActive = true
        fillStackView("horizontal")
    }
전체 코드는 여기서 볼 수 있습니다.
GitHub - dev-dain/ios-blog: 블로그에 올릴 iOS 포스트 예제 프로젝트를 올리는 저장소입니다.
블로그에 올릴 iOS 포스트 예제 프로젝트를 올리는 저장소입니다. Contribute to dev-dain/ios-blog development by creating an account on GitHub.
github.com
2. 스토리보드
* 나를 위한 요약
- ContentView로 StackView를 쓰면 그나마 사정이 좀 나은데 UIView를 ContentView로 쓰면 약간.. 빡셉니다 -_- 이해도 잘 안 되고?
- (1) 일단 최상위 View 아래에 ScrollView 추가, Safe Area에 4방향 constraint 0으로 걸기
- (2) ScrollView 아래에 contentView로 쓸 UIView 추가
- (2)-(a) UIView를 ScrollView의 Content Layout Guide에 4방향 constraint 0으로 걸기
- (2)-(b) UIView를 ScrollView의 Frame Layout Guide trailing에 constraint 0으로 걸기, Eqaul Height 걸고 priority 250으로 조정
- (3) UIView 안에 다른 뷰들을 넣는데, 이 때 스크롤뷰의 가장 아래에 있는 뷰에는 반드시 bottom constraint를 추가할 것 (안 그러면 스크롤 안됨)
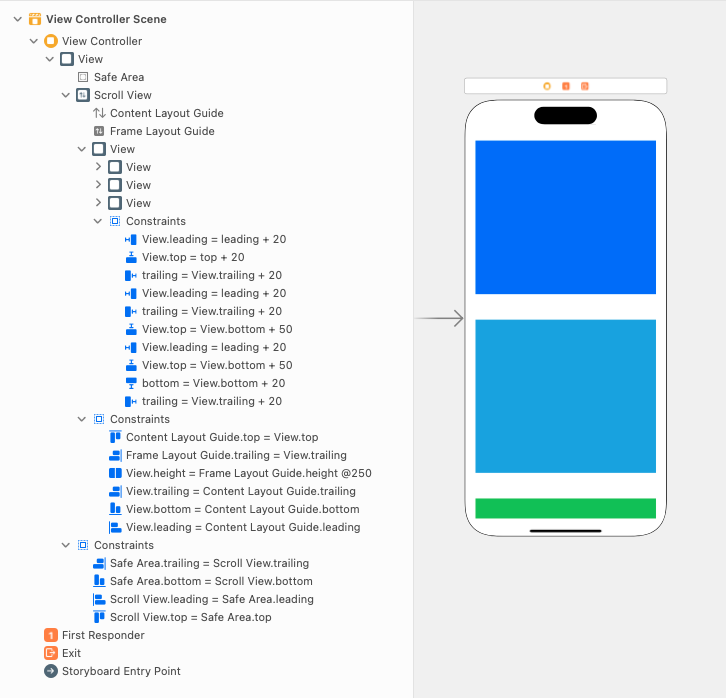
(1) 스토리보드에 Scroll View를 추가합니다. 크기는 딱히 지정 안 해도 됩니다.
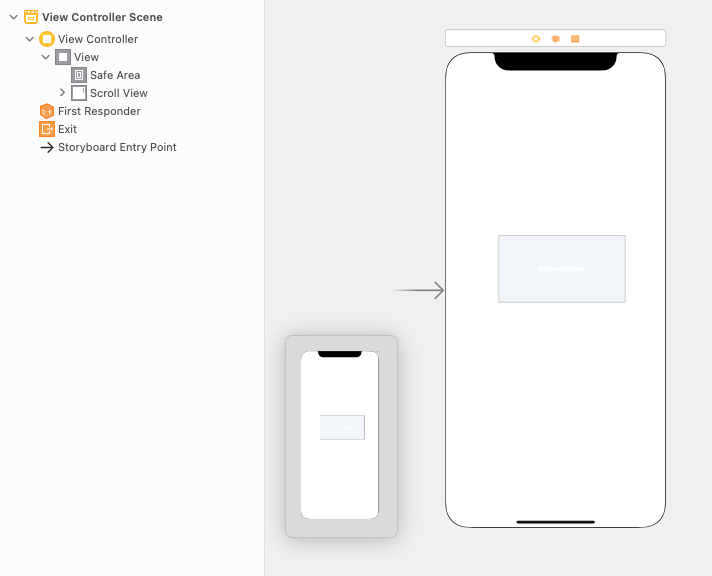
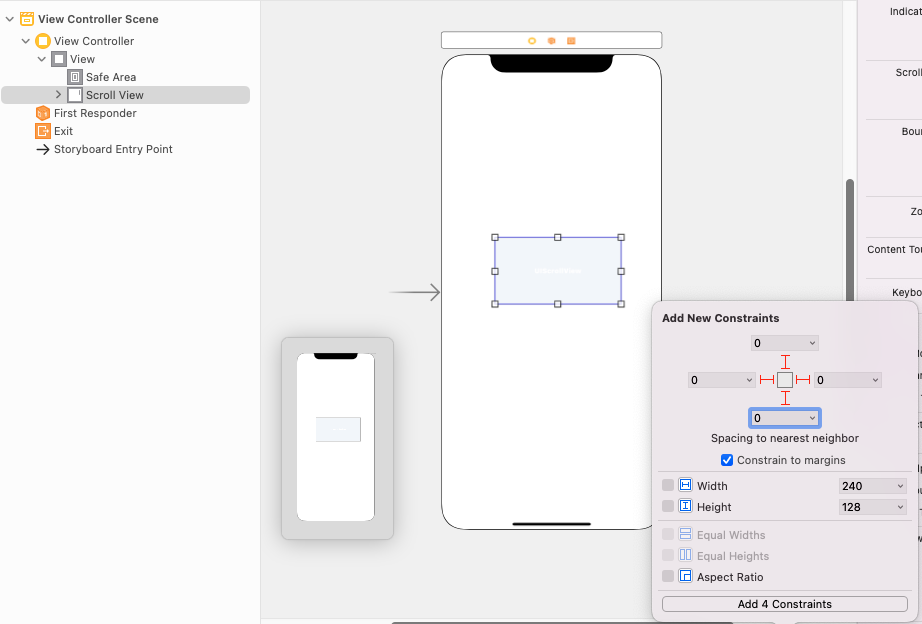
(2) 일단 이 스크롤 뷰를 화면에 꽉 채우기 위해 Constraint를 4방향 모두 0으로 줍니다. 빨간 줄이 그어지지만 괜찮습니다.
4방향 모두 0으로 constraint를 줬기 때문에, Frame Layout은 화면만큼의 영역을 차지하게 됩니다.
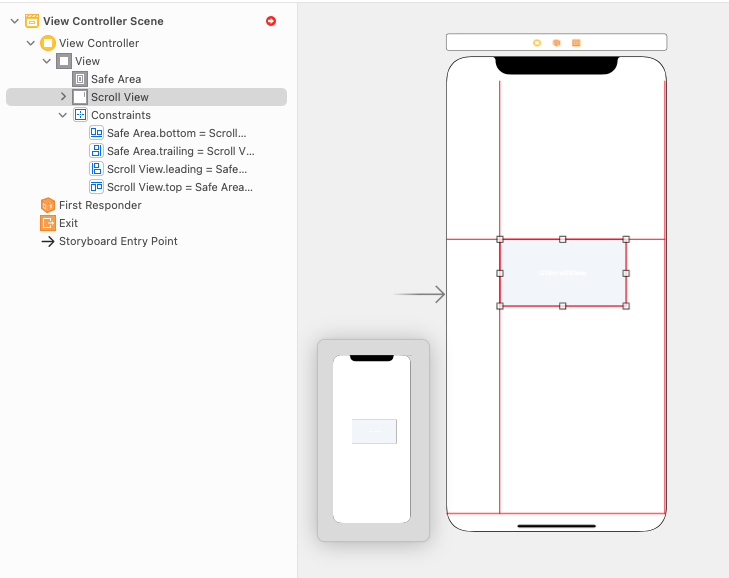
(3) 다음으로 스크롤 뷰에 실제로 보일 뷰를 추가합니다. 저는 스택 뷰를 추가하겠습니다.
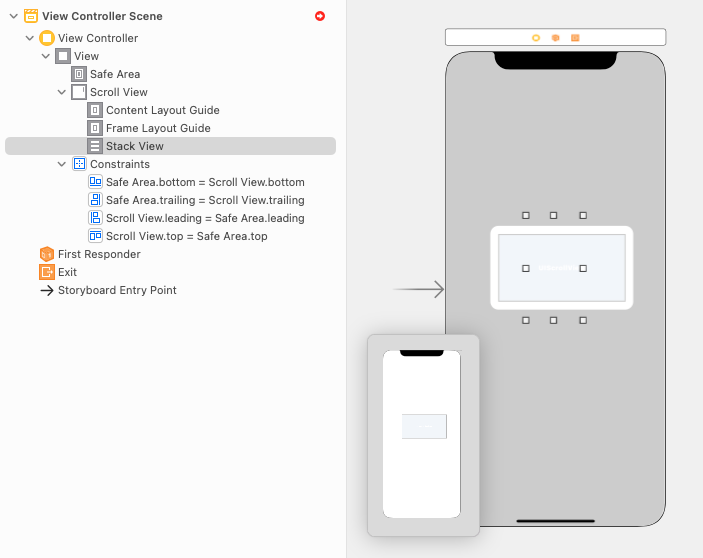
(4) 스택 뷰를 스크롤 뷰의 Content Layout Guide에 맞춰 Constraint를 줍니다. 이 때, leading, trailing, top, bottom 모두에 앵커를 걸어 줍니다.
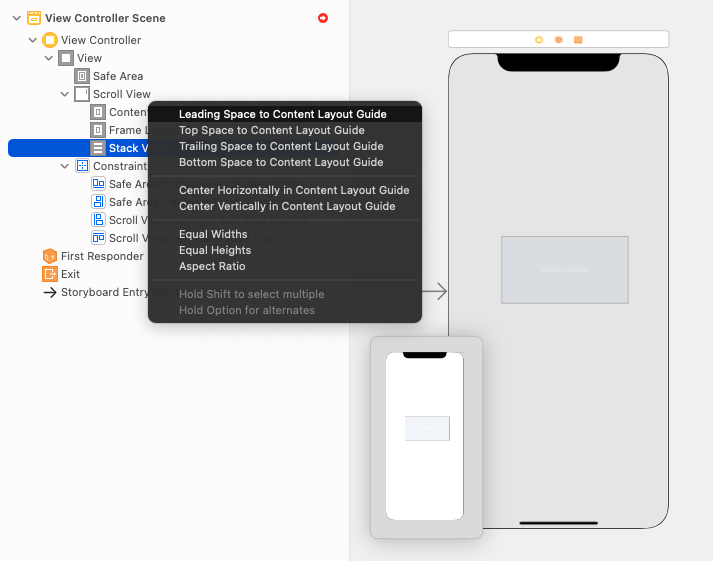
(5) original size 때문에 원치 않는 constant 값이 붙었습니다.
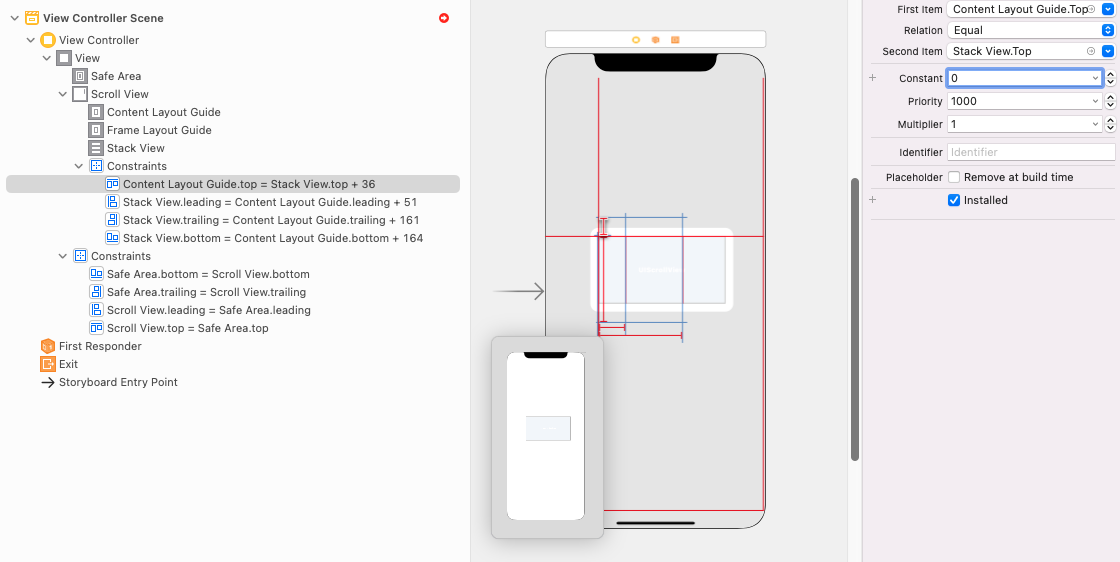
XCode 화면 오른쪽의 인스펙터에서 모든 값들의 Constant를 0으로 맞춥니다.
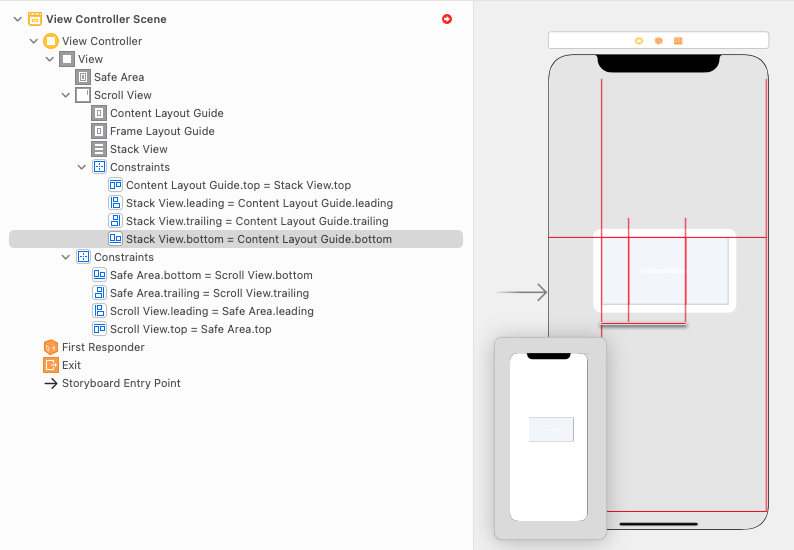
(6) 아직까지 빨간 줄이 많이 뜨는 이유는 contentView의 실질적인 width, height가 없기 때문입니다.
세로 스크롤하려면 width 값은 고정하고 height 값은 contentView에 포함될 뷰들의 constraint 등에 따라 유동적이어야겠죠.
스택 뷰의 height를 Frame Layout Guide - Equal Height로 제약을 겁니다.
(혹은, width를 Frame Layout Guide - Equal Width로 제약을 걸어도 됩니다. 두 경우 모두 세로 스크롤이 되네요. 단, 이 경우에는 자동으로 Missing Constraints를 추가하면 Stack view.bottom = Frame Layout Guide.bottom 제약이 생기며, 이 priority를 250으로 내려야 스크롤이 가능합니다. 이 경우에는 bottom이 유동적일 수도 있다는 것을 의미합니다)
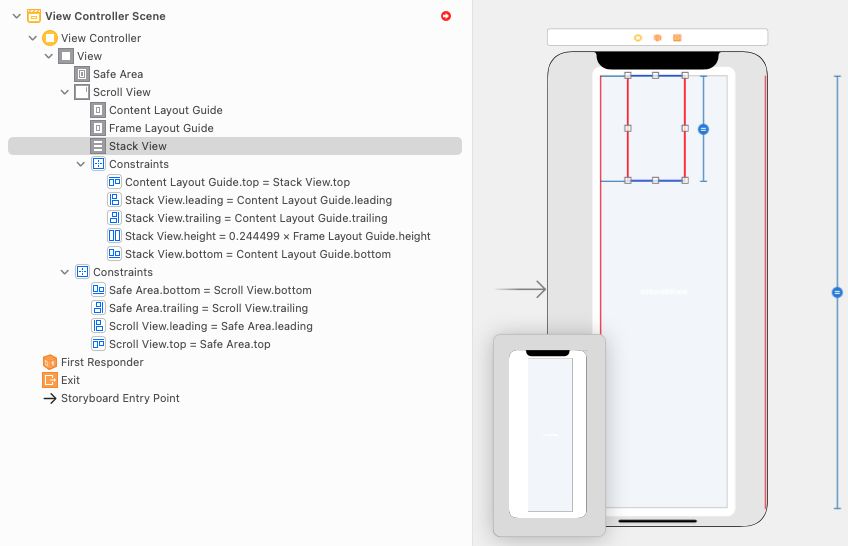
그럼 스크롤 뷰가 이렇게 늘어났습니다.
역시 원치 않는 값이 곱해져 있으므로 오른쪽 인스펙터에서 Multiplier를 1로 변경합니다.
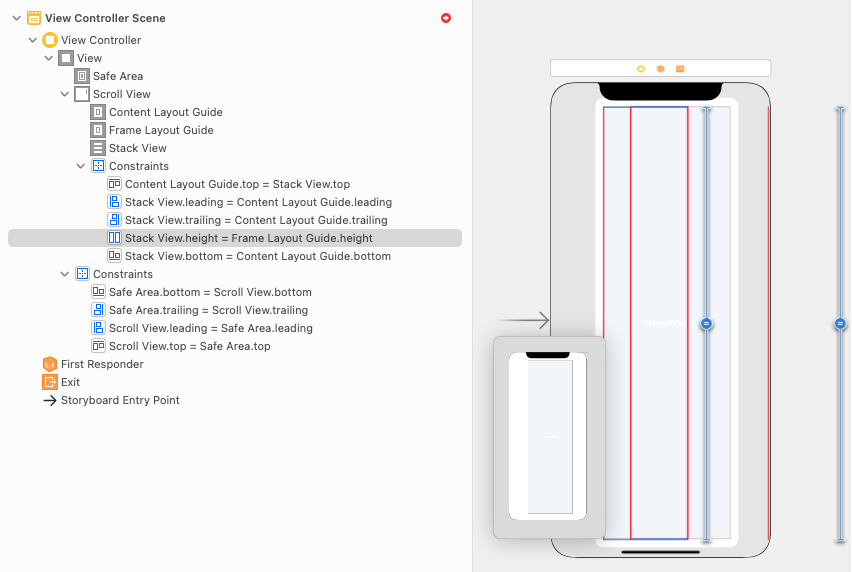
(7) 아직도 빨간 줄이 뜨고 있습니다. 제약 경고를 보니 스크롤 뷰에 X축 위치나 너비를 줘야 한다고 나오네요.
여기서 Add Missing Constraints를 누르거나, 스택 뷰의 trailing을 Frame Layout Guide Trailing 값과 맞춰주면 됩니다. contentView의 trailing은 Frame Layout이랑 똑같아~ 하는 겁니다.
(* Equal Width - bottom, Equal Height - trailing 둘 모두 효과는 같음)

(8) 그럼 다음과 같이 빨간 줄이 없어졌고, 스크롤 뷰가 가로로 늘어났습니다.
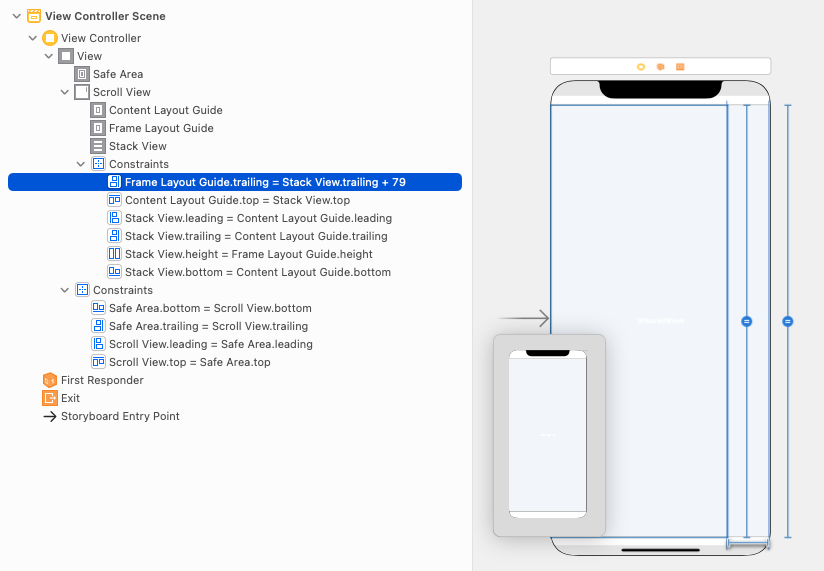
trailing에 Constant가 붙었으므로 0으로 떼 줍니다.
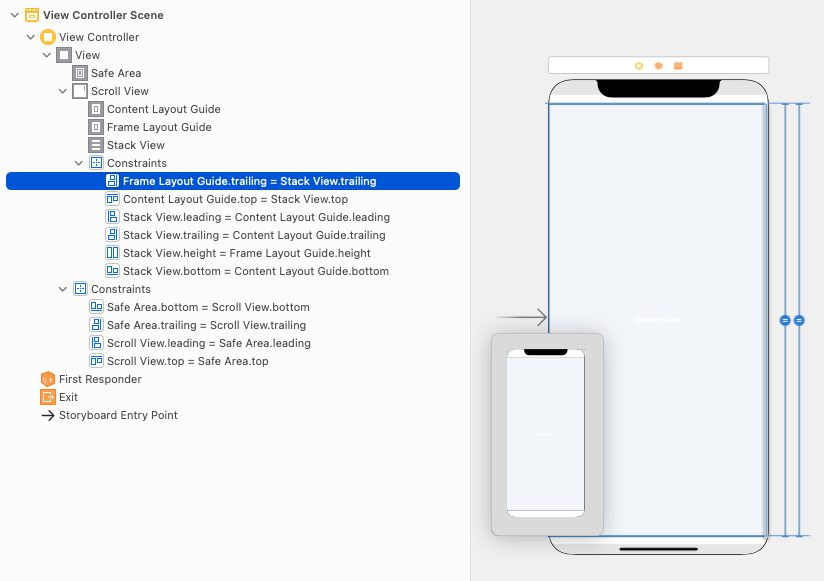
(9) ViewController.swift 파일로 돌아옵니다. 스택 뷰를 IBOutlet 변수로 연결하고, 커스텀 함수를 하나 만들어 스택 뷰에 UIView들을 채워넣겠습니다.
import UIKit

class ViewController: UIViewController {

    @IBOutlet weak var stackView: UIStackView!

    override func viewDidLoad() {
        super.viewDidLoad()
        fillStackView()
    }

    private func fillStackView() {
        let colorArray = [UIColor.blue, .red, .yellow, .purple, .green, .black, .orange, .gray]
        for color in colorArray {
            let elementView = UIView()
            elementView.backgroundColor = color
            elementView.translatesAutoresizingMaskIntoConstraints = false
            elementView.heightAnchor.constraint(equalToConstant: 300).isActive = true
            stackView.addArrangedSubview(elementView)
        }
    }
}
실행해보면 스크롤이 되지 않습니다.
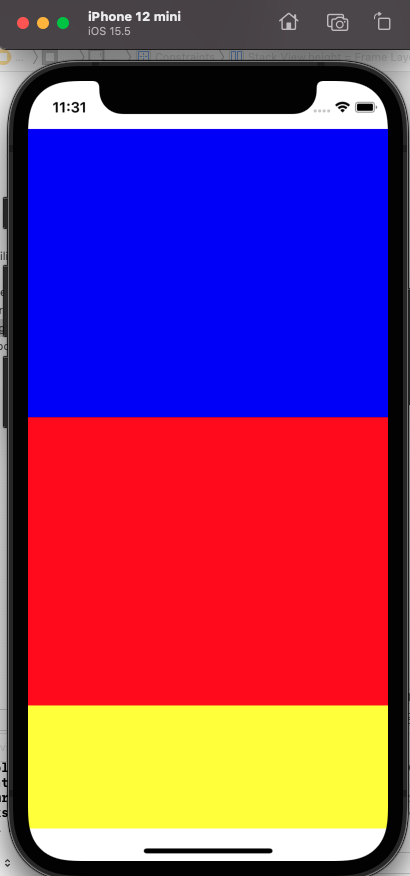
(10) 이유는 스택 뷰의 height를 Frame Layout Guide height와 똑같이 준 제약에 있습니다. 현재는 우선 순위가 최고라서 항상 frame layout guide와 스택 뷰는 같은 높이를 유지하게 되는데요. 이 Priority를 250으로 낮춰 줍니다. 우선순위를 낮게 줌으로써, 스택 뷰의 높이는 동적으로 변경될 수 있습니다.
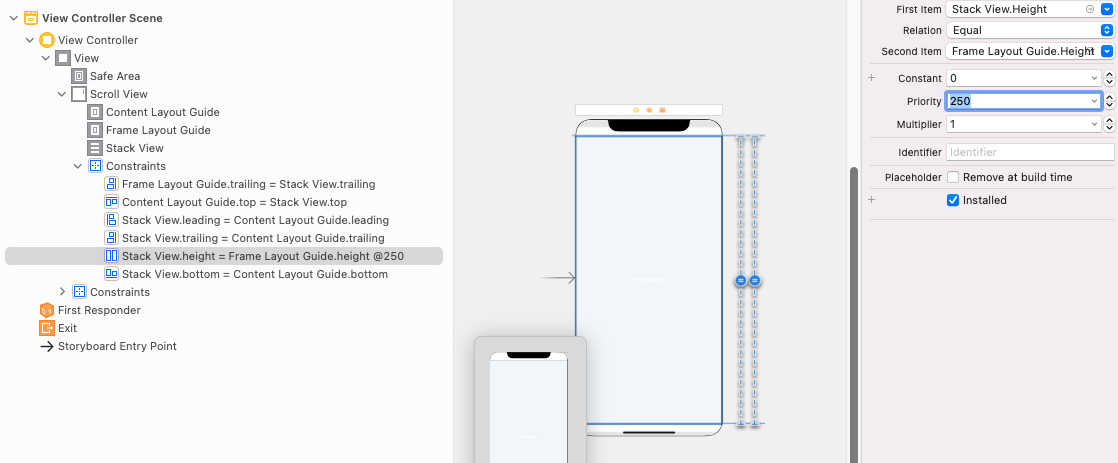
다시 실행해보면 스크롤이 잘 되는 것을 확인할 수 있습니다.

전체 코드는 여기서 볼 수 있습니다.
GitHub - dev-dain/ios-blog: 블로그에 올릴 iOS 포스트 예제 프로젝트를 올리는 저장소입니다.
블로그에 올릴 iOS 포스트 예제 프로젝트를 올리는 저장소입니다. Contribute to dev-dain/ios-blog development by creating an account on GitHub.
github.com
'앱 > Swift' 카테고리의 다른 글
| [iOS] Dynamic Type을 지원하되, weight는 커스텀하기 (0) | 2022.10.13 |
|---|---|
| FSCalendar 토요일, 일요일 색깔 다르게 만들기 (0) | 2022.09.20 |
| [UIKit] pushViewController vs show 차이점 (0) | 2022.08.02 |
| [CocoaPods] GoogleSignIn 의존성 충돌 문제가 난다면... (0) | 2022.07.27 |
| [UIKit] UICollectionView와 컨트롤러 알아보기 (0) | 2022.07.15 |
